반응형
리눅스 톰캣 Let's Encrypt무료 ssl 인증 방법
1.인증서 설치는 standalone 방식을 이용한다.
certbot 설치
[root@main36 conf]# yum -y install certbot2.우선 웹서버를 중단시킨다. 이는 80번 포트를 사용하지 않도록 하기 위함이다.
[root@main36 home]# systemctl stop httpd3.인증서를 생성한다.
서버를 끌수 있는 경우
[root@main36 home]# certbot certonly --standalone -d {사이트명}

서버를 끌수 없는 경우
[root@main36 home]# certbot certonly --webroot -d {사이트명}

예))
[root@main36 home]# certbot certonly --standalone -d test.kr
이증서 요청은 주 5회로 초과한 경우 다른형식의 도메인을 동시에 초영한다.
예([root@main36 home]# certbot certonly --standalone -d test.com -d www.test.com
인증서가있다면 갱신할지 생성할지 1번, 2번 고르는 화면이 나온다.

첫 번째에서 서버 관리자 이메일 주소를 입력한다.
두 번째 는 약관 동의하는 것으로 Y를 입력한다.
세 번째는 여러 수신 동의를 묻는 것으로 동의하면 Y, 거부하면 N을 입력한
4. key경로
- cd /etc/letsencrypt/live/도메인
5. server.xml수정
경로이동
[root@main36 home]# cd /톰캣 경로/conf/

수정
[root@main36 home]# vi server.xml
주의사항
- protocol="org.apache.coyote.http11.Http11AprProtocol"
- protocol="org.apache.coyote.http11.Http11NioProtocol"
- Http11AprProtocol의 경우 별도의 수정이 필요하다.
- Http11NioProtocol로 진행
<Connector port="443" protocol="org.apache.coyote.http11.Http11NioProtocol" maxThreads="150" SSLEnabled="true">
	<SSLHostConfig>
		<Certificate certificateKeyFile="/etc/letsencrypt/live/도메인명/privkey.pem"
					 certificateFile="/etc/letsencrypt/live/도메인명/cert.pem"
					 certificateChainFile="/etc/letsencrypt/live/도메인명/fullchain.pem"
					 type="RSA" />
	</SSLHostConfig>
</Connector>
- 인증서 갱신 명령어 작동 확인
[root@main36 home]# certbot renew --dry-run6. 443포트 열기
[root@main36 home]# firewall-cmd --permanent --zone=public --add-port=443/tcp- 포트 닫기(닫을일은 없지만 혹시몰라서 적어둔다.)
[root@main36 home]# firewall-cmd --permanent --zone=public --remove-port=8443/tcp
- 수정적용
[root@main36 home]# firewall-cmd --reload- 열어진 포트 확인 명령어
[root@main36 home]# firewall-cmd --list-all- 아파치 서버를 재기동
[root@main36 home]# systemctl start httpd재기동중 오류
- 443포트를 사용중이기 때문에 포트를 죽여준다.
[root@main36 home]# kill -9 해당포트

예
[root@main36 home]# kill -9 19017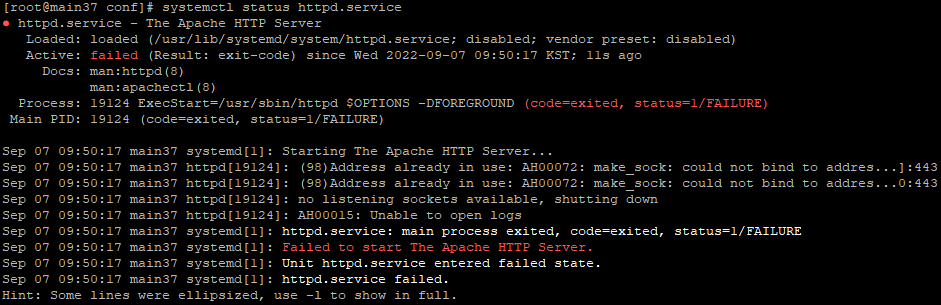
- 사용중인 포트 확인방법
[root@main36 home]# netstat -nlp
빠른설정
1. [root@main12 conf]# yum -y install certbot

2. [root@main12 conf]# systemctl stop httpd

3. [root@main12 conf]# certbot certonly --standalone -d vincoding.ml

다른 putty로 열어둔다
5. [root@main12 conf]# cd /etc/letsencrypt/live/vincoding.ml

6. [root@main12 conf]# vi /home/opc/apache-tomcat-8.5.27/conf/server.xml

7. 검색 > org.apache.coyote.http11.Http11NioProtocol
<Connector port="443" protocol="org.apache.coyote.http11.Http11NioProtocol" maxThreads="150" SSLEnabled="true">
	<SSLHostConfig>
		<Certificate certificateKeyFile="/etc/letsencrypt/live/도메인명/privkey.pem"
					 certificateFile="/etc/letsencrypt/live/도메인명/cert.pem"
					 certificateChainFile="/etc/letsencrypt/live/도메인명/fullchain.pem"
					 type="RSA" />
	</SSLHostConfig>
</Connector>

8. [root@main12 conf]# firewall-cmd --permanent --zone=public --add-port=443/tcp

8. [root@main12 conf]# firewall-cmd --permanent --zone=public --add-port=8443/tcp

9. [root@main12 conf]# firewall-cmd --reload

10. [root@main12 conf]# firewall-cmd --list-all

11. [root@main12 conf]# setenforce 0

12. [root@main12 conf]# systemctl restart httpd

13. [root@main12 conf]# vi /etc/httpd/conf/extra/default.conf
변경
<VirtualHost *:80>
        ServerName      localhost
        JkMount /*      instance
추가>        RewriteEngine On
추가>        RewriteCond %{HTTPS} !on
추가>        RewriteRule ^(.*)$ https://%{HTTP_HOST}$1 [R,L]
</VirtualHost>
반응형
'서버 > Linux' 카테고리의 다른 글
| 리눅스 mysql 설치 방법 (0) | 2022.09.25 |
|---|---|
| 리눅스 웹 프로젝트 배포(톰캣) (0) | 2022.09.13 |
| CentOS SELinux 설정 및 해제하기 (0) | 2022.08.19 |
| 리눅스 도메인(DNS)설정 방법 (0) | 2022.08.06 |
| 리눅스 에러확인 방법 journalctl | tail (0) | 2022.07.23 |


